This article details a FileBound Implementation Plan covering FileBound Setup, Project Discovery, Document Capture, User Setup, User Training, Project Implementation, FileBound Support/Communication, and Maintenance.
Click Here to Download the FileBound Implementation Plan
- FileBound Setup – IMS will work with customer to do all server site (on premise) installations but may request assistance from FileBound support when needed. For detailed information on FileBound requirements and configuration you can access the FileBound 7.5 Product Guide and Information website here: https://community.uplandsoftware.com/hc/en-us/articles/360025523051-FileBound-7-5-Product-Guide-and-Information
- On-premise server site
- Verify with customer the proposed FileBound installation configuration, web server, database server, document storage server, etc.
- Verify with customer that servers meet FileBound’s hardware and software requirements
- Gather needed configuration information
- Document storage location
- Database server and login credentials
- Install FileBound via FileBound’s Central Installation program at install.filebound.com The Central Installation program will alert you to any requirements that aren’t met.
- Configure main options to meet the customers’ requirements
- On-premise server site
- Discovery
- Identify business areas that will be creating FileBound projects
- Identify Project Managers, for both IMS and the customer
- Identify specific projects that the customer wants
- For each project requested identify:
- Project name
- Index (search) fields
- Project Separators/Dividers
- Workflows
- E-Forms
- Full Text Search?
- Determine if additional FileBound software installation will be required
- Windows viewer
- FileBound Capture
- FileBound Connect
- Document Capture
- Determine how existing documents will be put into FileBound
- Will paper documents be scanned by the customer or by IMS
- Is there Microfilm or Microfiche that needs to be converted
- Is there electronic documents that will need to be brought into the system
- Is there an existing Document Management System that documents will need to be converted from?
- Will documents be scanned as multi-page PDFs or single page Tiffs
- If PDF, should they be searchable PDFs?
- Should they be OCR’dI
- If PDF, should they be searchable PDFs?
- Determine how existing documents will be put into FileBound
- User setup
- Identify all users needing access
- Create user accounts
- Determine security levels needed and create user security groups accordingly
- Assign users to appropriate groups
- Assign groups to appropriate projects
- Install user software (Windows Viewer, FileBound Connect, FileBound Capture) as needed
- User Training
- Determine who needs to be trained and what level of training is needed for each group
- Super users, inquiry only users, etc.
- IT staff
- Determine the method(s) of training that will be provided for each group
- Online via GoToMeeting
- Onsite
- Training manuals
- Determine who needs to be trained and what level of training is needed for each group
- Project Implementation
- Customers new to FileBound
- Ensure project security has been applied.
- If IMS is responsible for the initial documents being added to the project either via scanning or conversion, then some documents should be added before user training occurs.
- Once user training has been conducted access to projects should be given.
- If the customer is adding the initial documents themselves, then training should occur before users start adding documents into their production projects. A Test Project should be set up for training purposes before users are granted access to their production projects.
- Once training has been conducted access to projects should be given
- Customers experienced with FileBound
- Ensure project security has been applied
- Determine if any user training is needed
- If no user training is needed customers should be given access to their project as soon as the project is available, otherwise as soon as training has been conducted.
- All completed documentation should be filed under the customer’s file in the IT Central FileBound Project.
- Customers new to FileBound
FileBound Installation & Configuration
- FileBound 7.5 Production & Test/Dev Recommendations (starting out but increase resources as necessary)
- FileBound is a web application comprised of Internet Information Services (IIS), SQL Database and File Servers.
- When setting up a FileBound installation there are many variables that must be considered when determining the proper hardware. FileBound is a scalable solution that can grow as the needs grow. This scalability can allow FileBound to fit into solutions of different sizes by merely adjusting the hardware that is used to host FileBound. (Note: The FileBound 7 series is only supported on 64bit operating systems.)
- Production
- Web Server
- Server Class: C2
- Dual Processor, Dual-Core Xeon, 64bit or equivalent, .NET Framework 4.5.2
- RAM: 16 GB
- HD Space: 50 GB RAID Configuration
- Windows Server 2016 or 2019
- Document Storage Server
- Server Class: C1
- Dual Processor Xeon or equivalent, 64bit, .NET Framework 4.5.2
- RAM: 8 GB
- HD Space: Start off with 1TB and adjust based on project discovery
- Windows Server 2016 or 2019
- Database Server
- Server Class: C3
- Dual Processor, Quad Core Xeon, 64bit or equivalent, .NET Framework 4.5.2
- RAM: 64 GB
- HD Space: 300 GB RAID Configuration
- SQL Server Standard License – Include Full Text Search feature is installed so OCR data can be searched from within FileBound. Also, make sure SQL server was installed with Mixed Mode
- MS SQL Server 2016 or 2019
- Database backups should be performed daily, and index maintenance should be done weekly.
- More information regarding SQL Server configuration and best practices can be found at the following web site: https://docs.microsoft.com/en-us/sql/sql-server/?toc=..%2Ftoc%2Ftoc.json&view=sql-server-2017
- FileBound Swarm or Enterprise Services Server (if needed)
- This server will assist with automating tasks depending on the FileBound implementation. For example, if Active Directory (AD) is used this server can be used to automate the synchronization of AD. FileBound Document Management (DM) & Workflow (WF) licenses can automate AD Sync, Global Search, Recycle Bin Cleaner and Renditions. In addition to the aforementioned automations an Enterprise license can be configured to automate Auto-Index, Auto-OCR, Scheduled Workflows, Scheduled Reports, and Site-OCR.
- Dual core processor
- RAM: 8 GB
- HD Space: 250 GB
- The following will be needed for Swarm if Enterprise Services isn’t installed but automation services are needed.
- Docker Desktop for Windows v18.09
- Windows 10 64bit: Pro, Enterprise or Education (1607 anniversary Update, Build 14393 or later)
- Hyper-V Installed
- Virtualization is enabled in BIOS
- CPU SLAT-capable feature.
- A FileBound Swarm cannot be hosted on the same hardware as the FileBound application or database server.
- If additional Automation Event processing is required, you can add additional nodes to the swarm.
- Web Server
- Test (test hardware recommendations is with the assumption that it will have not contain more than 50,000 objects; however, resource recommendations can be adjusted based on actual usage.)
- Web Server
- Server Class: C1
- Dual Processor, Dual-Processor Xeon, 64bit, .NET Framework 4.5.2
- RAM: 8 GB
- HD Space: 50 GB RAID Configuration
- Windows Server (same as Production)
- Document Storage Server
- Server Class: C1
- Dual Processor Xeon or equivalent, 64bit, .NET Framework 4.5.2
- RAM: 8 GB
- HD Space: Start off with 500 GB and adjust based on project discovery
- Windows Server (same as Production)
- Database Server
- Server Class: C1
- Dual Processor Xeon or equivalent, 64bit, .NET Framework 4.5.2
- RAM: 16 GB
- HD Space: Start off with 250 GB and adjust based on project discovery
- MS SQL version same as Production
- Database backups should be performed daily, and index maintenance should be done weekly.
- FileBound Swarm or Enterprise Services Server (if needed)
- See Production specs and software requirements listed above.
- Web Server
- Client Hardware Recommendations
- MINIMUM PC REQUIREMENTS TO OPERATE FILEBOUND 7.5
- Supporting Operating Systems:
- Windows 8.1 (32 bit and 64 bit) - End of Life: Jan 10, 2023
- Windows 10 (32 bit and 64 bit)
- Supported Internet Browsers:
- Internet Explorer 11.x
- Microsoft Edge (current version)
- FireFox (current version)
- Chrome (current version)
- Safari (current version)+
- Processor:
- Minimum Requirement: 2 Ghz dual core
- Recommended: 3 Ghz quad core
- Ram
- Minimum Rquirment: 8 GB
- Recommended: 16 GB
- Other Requirements:
- Microsoft .NET Framework 4.5.2
- Supporting Operating Systems:
- MINIMUM PC REQUIREMENTS TO OPERATE FILEBOUND 7.5
- Server Certificates
- To configure your FileBound site to use SSL you will need to acquire an SSL certificate and install it on your IIS server.
- Install & configure Web Server software
- IIS INSTALLATION CONFIGURATION
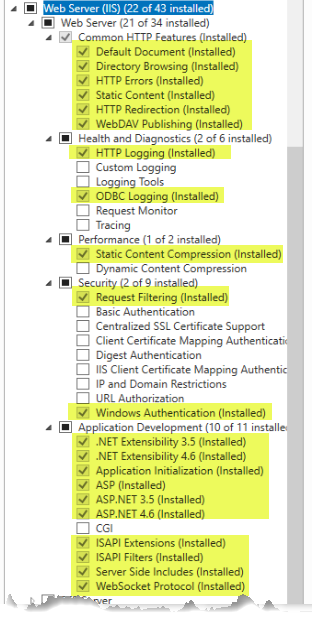
- Go to Program Features (run command: appwiz.cpl) and “Turn Windows Features on or off” under Web Server (IIS) add server role items as highlighted below. Also add IIS Web Management Tools.
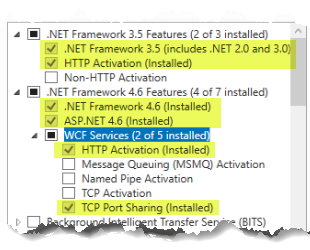
- Add .Net Framework Features as highlighted or equivalent below.
- Go to Program Features (run command: appwiz.cpl) and “Turn Windows Features on or off” under Web Server (IIS) add server role items as highlighted below. Also add IIS Web Management Tools.
- IIS INSTALLATION CONFIGURATION
- Install FileBound on Web Server
- Install FileBound Central Installation
- FileBound Central Installation is an application that is used to manage FileBound sites. It needs to be installed on the server that FileBound will be installed on. FileBound Central Installation can be used to manage any FileBound servers that are on the same network. You can add a new site, upgrade an existing site, modify configurations, apply licenses, and much more using FileBound Central Installation.Install FileBound Central Installation
- FileBound Central Installation accesses the following sites for downloads, data, and licensing. Verify that the Web Server (IIS) can get to these websites and resolve as necessary before proceeding.
- FileBound.com
- Products.FileBound.com
- Support.FileB ound.com via port 80
- Ports 80 and 443 should be open in order for FileBound Central Installation to function correctly.
- Go to https://install.filebound.com
- Select Start Installation.
- Verify the setup.exe file is not blocked.
- Select “Run as administrator” on the downloaded setup.exe file.
- If you receive “An error occurred while attempting to install FileBoundCentralInstallation.” With detailed error indicating “An error occurred trying to download 'https://install.filebound.com/app/FileboundCentralInstallation.application'. See the setup log file located at 'C:\Users\Press\AppData\Local\Temp\VSD9993.tmp\install.log' for more information.
- Browse to this URL to continue: ‘https://install.filebound.com/app/FileboundCentralInstallation.application'.
- Obtain a database user ID with the DBCreator role. To operate the database the user must be Mapped as the database owner (this is a post installation step)
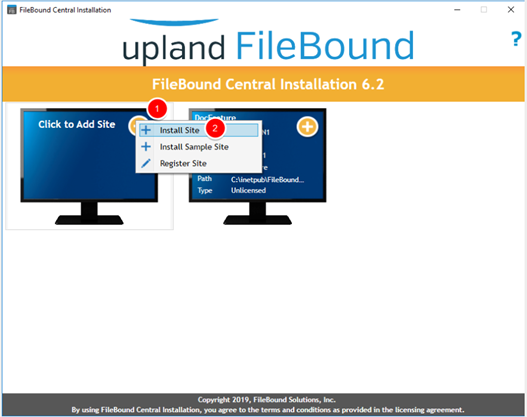
- Install a site once FileBound Central Installation is Installed
- Click Add Site, then select Install Site.
- Type the authorization code in the box, then click Next.
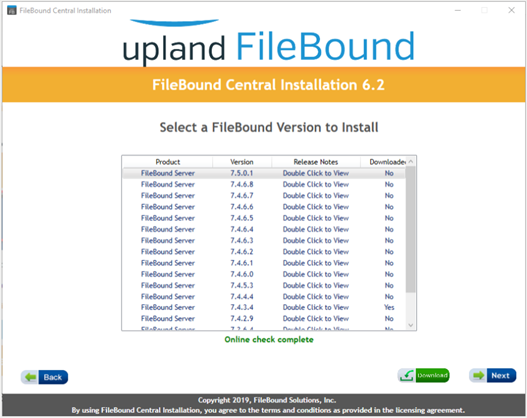
- Select the FileBound version you want to install, then click Next.
Note: You can view the release notes for a version by double-clicking the link under the Release Notes column. If the version of a FileBound is previously installed, Yes appears under the Downloaded column for that version.
- Ensure all the prerequisites listed are available on the system, then click Next.
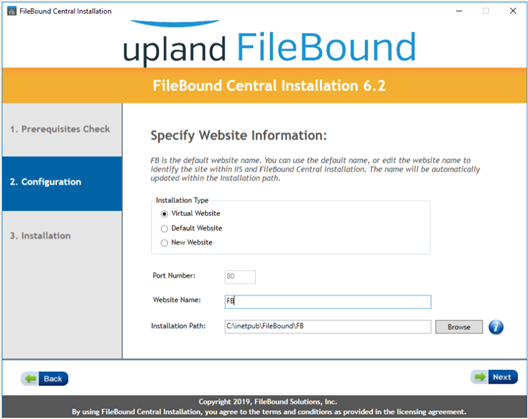
- Select an Installation Type. The following options are available:
- Virtual Website: Adds a virtual website.
- Default Website: Adds a default website.
- New Website: Adds a new website.
- Type a name for the site in the Website Name
- Click Browse to specify a location for the installation.
- In the Browse For Folder dialog box, select a location where you want install the FileBound site, then click OK.
- Click Next.
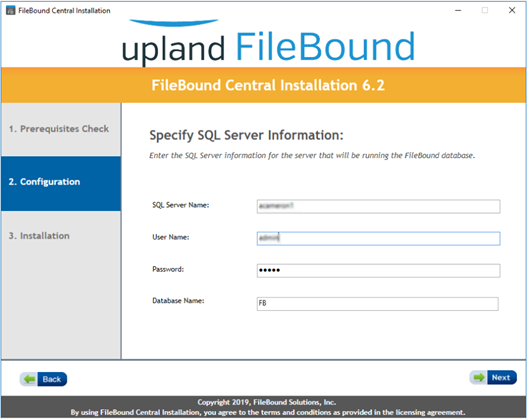
- Type the name of the server in the SQL Server Name
- Type the user name for the SQL server in the User Name
- Type the password for the SQL server in the Password
- Type the name of the database in the Database Name
- Click Next.
- Select Yes, to use SSL on the FileBound website, then click Next.
Note: If the FileBound server will be accessible to the Internet, it is recommended that Secure Socket Layer (SSL) be used on the FileBound website. - Click Browse to specify a location to store all the documents and images that are uploaded to FileBound.
- In the Browse For Folder dialog box, select a document storage location, then click OK.
- Click Next.
- Verify the information provided for the installation, then click Next.
- Click Next to start the installation process. The required FileBound version will be downloaded, if it was not downloaded earlier.
- Click Next to return to the main screen after the installation is complete.
- Click Add Site, then select Install Site.
- Install FileBound Central Installation
- Configure IIS (Web Server)
- Application Pool Setup:
- Step 1: Under application pools select the application pool associated with the FileBound site make sure it is set up correctly.
- Look for the Application Pool in your IIS Manager. Under application pools select the application pool to make sure it is set up with .NET version set to v4.0 & 32-Bit Applications Enabled (Set to False).
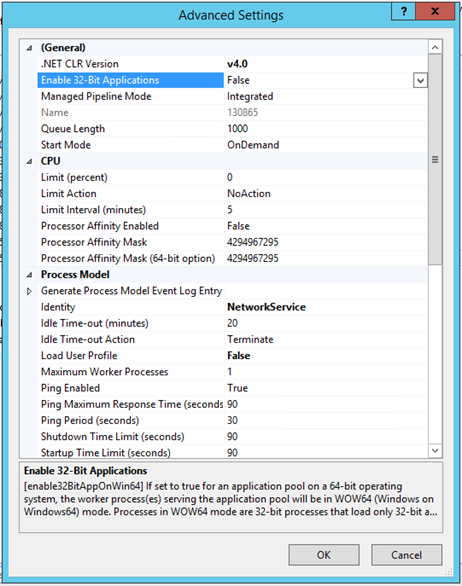
Note: If you are missing ASP.NET v4 from the list, run the following command from the command prompt.
Also “Enable 32-bit Applications” will not be an available option on 32 bit systems.
(32 bit systems): %systemroot%\Microsoft.NET\Framework\v4.0.30319\aspnet_regiis.exe /i
(64 bit systems): %systemroot%\Microsoft.NET\Framework64\v4.0.30319\aspnet_regiis.exe /i
- Anonymous Authentication Setup:
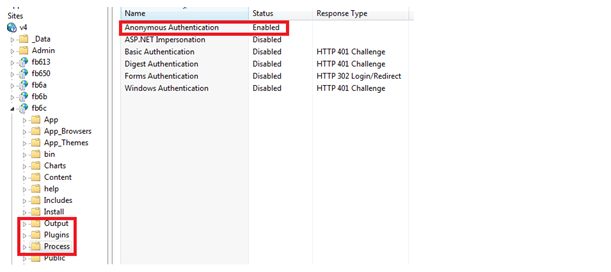
- STEP 1: Click on the virtual directory then double click on the Authentication icon.
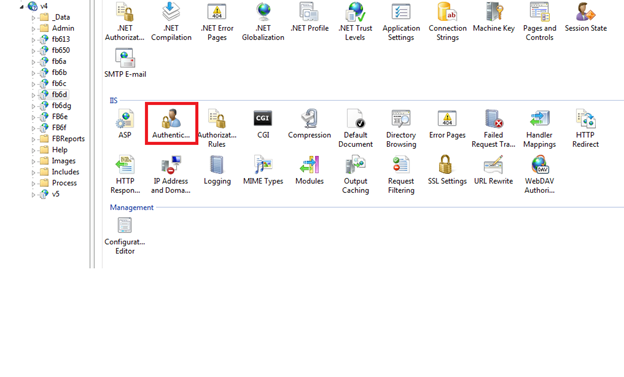
- STEP 2: Make sure that Anonymous Authentication and Forms Authentication are set to Enabled.
Note: The IUSR user account needs to have access to the FileBound Document Storage location, so if you are using non-local storage relative to the web server you may need to use a domain account. Preferably an account specifically created for this purpose whose password does not expire.
- STEP 1: Click on the virtual directory then double click on the Authentication icon.
- Active Directory Configuration:
- For sites using active directory login you will have to make a few changes to the standard “anonymous” configuration.Active Directory Configuration:
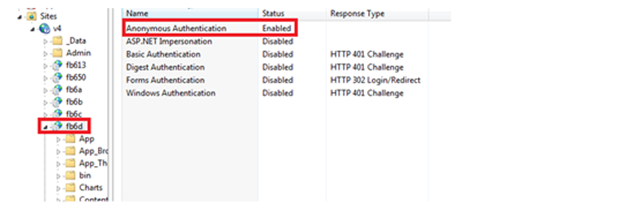
- STEP 1: Select the virtual directory and then double click on the Authentication icon to bring up the authentication settings. From here make sure that Windows Authentication is enabled, as well as ASP .NET Impersonation.
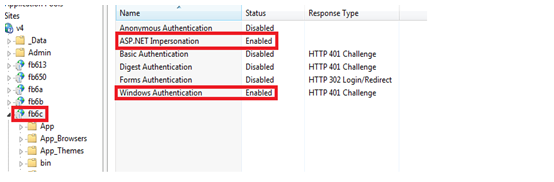
- STEP 2: Go to the Authentication settings of the "Process", "Output", and "Plugins" folders and make sure that Anonymous Authentication is enabled and that Windows Authentication is disabled.
Note: The IUSR user account needs to have access to the FileBound Document Storage location, so if you are using non-local storage relative to the web server you may need to use a domain account. Preferably an account specifically created for this purpose whose password does not expire.
- STEP 3: Make sure that any Domain Users that will be accessing FileBound have read & execute access to the FileBound site folder in inetpub directory.
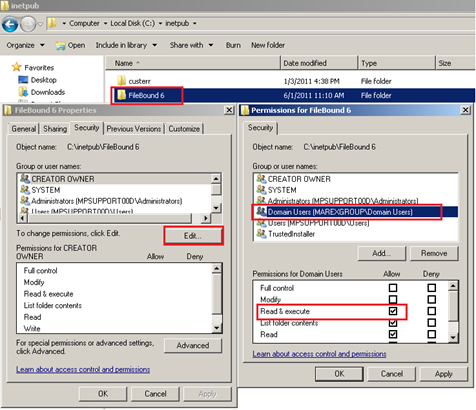
- STEP 4: Make sure that the "anonymous" account setup on the Process/Output/Plugins folders in setp 2 above has "Modify" access to the document storage location.
- Application Pool Setup:
Project Discovery Worksheet
Customer:
Customer Contact Info:
Project Name:
- Index Fields (Search Fields) (Each project can have a maximum of 20 index fields)
- Important factors to consider when determining Index Fields
- What criteria do I want to be able to search on to find the file I’m looking for? Common choices for people related files are: First name, last name, date of birth, and a unique identifier if one is available that will be known to staff who are conducting the search, such as; social security number, student ID, staff ID, etc.
- Is there date or location related information that I need, such as; incident date, location/building number, etc.
- Is there any type of status related information I need, such as; Certified, Uncertified, Past, Retired, etc.
- Do I need to the ability to produce reports from this project based on the index fields? If so, think about what you need to report on. For example, if you are creating an Incident Reporting Project you might need to be able to report on the number and type of incidents that occurred during a specified time period. In that case, you may want index fields such as; first name, last name, date of birth, role (option list – Perpetrator, victim, witness, etc.) incident type (option list – Bullying, Harassment, Fight, etc.), date of incident, location of incident, etc.Index Fields (Search Fields) (Each project can have a maximum of 20 index fields)
- If an individual will possibly have multiple files in one project, which is likely in a project like the Incident Reporting Project example above, then consideration should be given to creating a unique key by defining an index field such as File Number and defining the field type as; auto-counter. This will ensure that a unique key exists for each file and should eliminate the possibility of new incidents inadvertently getting merged with an existing file. The auto-counter will automatically increment by 1 with each file that is added so no two files will ever have the same file number even if all other identifying information is the same.
- Important factors to consider when determining Index Fields
| Field No. | Field Name | Type (Text, number, date, option list, auto-counter, Project-Link, etc.) | Key | Visual | Sort | Display | Req'd |
| 1 | |||||||
| 2 | |||||||
| 3 | |||||||
| 4 | |||||||
| 5 | |||||||
| 6 | |||||||
| 7 | |||||||
| 8 | |||||||
| 9 | |||||||
| 10 |
-
-
-
(Define Option List (dropdown) values in the “Type” section above, if more space is needed define them in the additional details section below) (Insert additional rows if more than 10 index fields are required)
-
-
-
Separators/Dividers (Separators and Dividers define how documents will be displayed (grouped) in the tree structure in the viewer. Most projects do not use Separators but there are cases where they are beneficial. Dividers are basically used to group the documents. Documents within a specific business area would be grouped under the appropriate Divider such as in an HR project, all application documents might be grouped under a divider called Applications, all payroll documents might be grouped under a divider called Payroll, etc. Separators are used to group Dividers that represent a specific business area. For example, a Benefits Separator might contain Dividers such as; Insurance, 401K, Education Reimbursement, etc. A Divider can be assigned to a specific Separator, meaning it will only be selectable under that Separator or a Divider can be unassigned which will make it available under all Separators. A good example would be a Miscellaneous Divider, every Separator might need this Divider so rather than creating and assigning one to each Separator you can just create one and leave it unassigned and it will be available under all Separators. If you’re not using Separators and the number of Dividers for a project reach 15 to 20 you should probably evaluate to see if adding Separators would be beneficial. Grouping Dividers for specific business areas by putting them into Separators might make finding specific documents easier when searching for them later. But if each Separator is only going to contain one or two dividers then Separators probably don’t add a lot of value to the project.
- Separator (Optional) -
- Dividers -
- Separator (Optional) -
- Dividers -
- Separator (Optional) -
- Dividers -
- Separator (Optional) -
- Workflows (Brief description)
- e-Forms (Brief description)
- Document Capture
- If back scanning is done who will do it? ☐Customer ☐IMS ☐N/A
- Is there Microfilm or Microfiche to be converted? ☐Yes ☐No
- Are there existing electronic documents to be brought into the system? ☐Yes ☐No
- If yes, provide detail:
- Conversion from a DM system? ☐Yes ☐No
- If yes, provide detail:
- Do they need to be OCR’d for full text search? ☐Yes ☐NoDocument will be scanned as: ☐Multi-page PDF ☐Tiffs ☐Single Page PDF
- If PDF, do they need to be searchable PDFs? ☐Yes ☐No
- Do they need to be OCR'd for full text search? ☐Yes ☐No
- Additional Software requirements? ? ☐FileBound Capture ☐FileBound Connect ☐ Psigen ☐N/A
- Additional Details -
User and Group Security Worksheet
Group Name:
☐Project Admin ☐Use Scanning Apps ☐Print & View All Reports ☐Add New Files to User’s Clipboard
File Rights
☐File Search ☐File Add ☐File Edit ☐Empty File Recycle Bin ☐File Delete ☐Batch
☐File Checkout/Checkin ☐File Transfer ☐Manage Files in Quality Control
Document Rights
☐Document Viewing ☐Document Printing ☐Document Emailing ☐Document Exporting
☐Document Add/Edit ☐Document OCR Editing ☐Document Deleting ☐Document Signing
☐Empty Document Recycle Bin ☐ Manage Indexing Queue Document
Workflow Rights
☐Workflow Initiation ☐Workflow Reports Only ☐Workflow Assignments Management
Annotation Rights
☐Allow Annotations ☐Show/Hide Annotations ☐Burn in Annotations ☐Allow Temp Annotations
Assign Projects:
Assign Users:
| User Full Name | User Email Address | System Admin? |
FileBound Support/Communication
- Support times are Monday-Friday 8:00-5:00 by our IT team. Outside of normal business hours, a support ticket can be submitted and will be responded to at the open of the next business day.
- Toll-Free: 800-803-3685
- On-line Service Desk:
- Support Email address: Support@imssecure.com
- IMS FileBound Knowledgebase: https://knowledge.imstechnologygroup.com/knowledge/filebound
Maintenance, New Releases/Upgrades, Patches/Bug Fixes
- All maintenance is provided in the annual maintenance fee
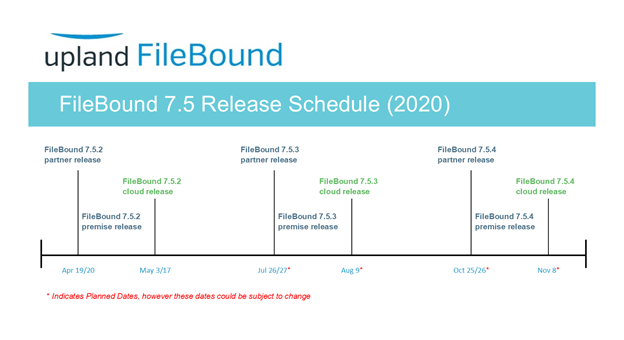
- FileBound 7.5 Product Release Schedule can be viewed here: https://community.uplandsoftware.com/hc/en-us/articles/360007060412-FileBound-7-5-Product-Release-Schedule
- We suggest installing the latest version of FileBound in your test environment and after extensive user testing is complete and signed off on we plan on installing in your Production environment.
- Database Maintenance plans We do recommend that you routinely maintain your database. Below are a few guidelines, but keep in mind that every business is unique, and your infrastructure should be evaluated by a database professional to ensure your server settings are tailored to fit your company’s specific needs
- Reorganize data and index pages on a regular basis. Leave Change free space percentage to 10%.
- Select Check database integrity and select attempt to repair any minor problems. This should be run on a regular basis.
- Be sure to backup your database regularly. There are many third party software applications that will automate this for you i.e. BackupExec. We generally recommend a full backup nightly. If you need point-in-time recovery, keep in mind that you will need to run SQL in full recovery mode and execute transaction log backups (hourly transaction log backups with full daily backups is common). Running SQL this way will typically increase the database size on disk by around 5%. This is generally only recommended if there are frequent changes to the site with high-volume scanning where losing a day of work is costly.
- We typically suggest rebuilding indexes on the database once you have exceeded a page count of 10 and a fragmentation level of 30%. Weekly rebuilds are generally sufficient though extremely high file/document throughput or high volume workflow may warrant more frequent (nightly/bi-weekly) index rebuilds.
- If the database is in full recovery mode, ensure that transaction log backups are run regularly, if you do not, the transaction log will grow uncontrollably causing you to run out of hard disk space and reduce performance.
- Run backups on a schedule that you’re comfortable with recovery. If nightly backups are sufficient (you’re willing to accept 24 hours of lost work) set the databases to simple recovery mode and don’t worry about transaction log backups, and run the backups nightly.
- Check Database integrity on same schedule as your full backup.
- Rebuild Files, Documents, and DocumentRoute table indexes nightly (if you’re importing large amounts of metadata, images, or workflow)
- Rebuild all Indexes weekly. This re-constructs corrupt or missing indexes in place on the server. A corrupt index can cause unexpected search results, either in the form of an error or returning more or fewer matches than it should.
- Update Statistics regularly. Weekly should be sufficient. If you have a high amount of through-put of files or documents, then nightly might be best, at least on those specific tables (dbo.files and dbo.documents).
- Note: Refer to the Microsoft SQL documentation to learn more about SQL maintenance plans.